How to Repair Roof Leaks and Prevent Major Damage
Dealing with a leaky roof? It’s essential to act fast and prevent further damage. Roof leaks are one of the most common issues homeowners face, yet they are often overlooked. In fact, roof-related issues account for 70-90% of home damage, yet only 38% of homeowners in the U.S. regularly check their roofs. A roof leak might seem minor at first, but it can lead to significant complications if not addressed quickly. Here’s a guide on how to fix a leaky roof and prevent costly damage down the road.
What Can Happen if You Don’t Fix a Leaky Roof?
A leaky roof may initially show up as a water spot on your ceiling, but if left untreated, it can create a series of problems. Roof leaks occur due to a variety of reasons, such as aging, lack of maintenance, moisture, corrosion, or damaged shingles. Water can travel beyond the roof, seeping into the attic, walls, and framing of your home.
Failing to fix a roof leak can lead to several issues:
- Insulation Damage: Water entering your attic can destroy insulation, requiring expensive replacement.
- Mold Growth: Leaking water can lead to mold and mildew, which cause health problems like allergies and respiratory issues.
- Electrical Hazards: Water infiltrating electrical systems can lead to safety hazards, such as short circuits and fire risks.
- Expensive Repairs: If ignored, leaks can damage drywall, flooring, and personal belongings, leading to costly repairs.
If water is entering near electrical wires, stop and contact a professional to ensure your safety.
How to Fix a Leaky Roof
If you’re ready to take on the task, follow these steps to fix minor roof issues and prevent future leaks.
Step 1: Identify Signs of Leakage
Inside your home, look for these signs:
- Water spots on ceilings, walls, or flooring
- Peeling paint near the roofline
- Light visible through the roof
- Damp or moldy attic insulation
- A dripping sound in the attic
- Musty odors
- Visible mold or mildew
On the outside, check for:
- Missing or damaged shingles
- Loose or damaged flashing
- Damaged pipes or vents on the roof
- Sagging roof areas
- Algae growth or dark streaks
Step 2: Exercise Safety Measures
Roof work is dangerous, so always prioritize safety:
- Use proper tools like a ladder, non-slip shoes, and a safety harness.
- Have a spotter on the ground to help you stay secure while working.
- Ensure your harness and ladder are secure before climbing.
- Choose a dry, sunny day with minimal wind for roof repairs.
Step 3: Identify Where the Leak Is Coming From
The leak’s location may not always be directly below the visible water spot. Start by inspecting the attic for signs of water stains, mold, or mildew. Trace the water path up the rafters to find the source.
If you’re having trouble pinpointing the leak, use a hose to simulate rainfall. One person should spray water on the roof while another watches for leaks inside the attic.
Common sources of leaks include:
- Roof Vents: Damaged flashing or cracked rubber boots can lead to leaks around vents.
- Chimneys: Cracks in the chimney crown or worn flashing are common causes of leaks around chimneys.
- Roof Valleys: Where two roof planes meet, the seal can break down, causing leaks.
Step 4: Repair Damaged Flashing
Flashings around vents or chimneys can wear out over time. To repair flashing:
- Clean the affected area.
- Apply a quality sealant to the damaged section.
- Smooth out the sealant to ensure it seals properly.
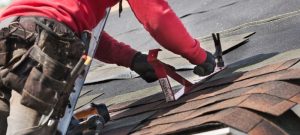
Step 5: Repair Damaged Shingles
If you’ve noticed damaged or missing shingles, follow these steps:
- Work in mild weather, avoiding extreme temperatures.
- Break the seal on the shingles using a bar.
- Remove the nails securing the damaged shingles.
- Install new shingles starting from the bottom and working upward.
- Seal the edges of the new shingles with sealant.
Step 6: Repair the Damaged Vent Boot
To fix a leaking vent boot, follow these steps:
- Measure the vent diameter and choose a replacement boot.
- Remove the old flashing.
- Apply sealant to the new flashing and install it around the vent.
- Secure the boot with nails and seal exposed nail heads.
If the damage is extensive or the leaks are widespread, it’s best to consult a professional roofer who can properly assess the situation and fix the issue while ensuring your materials remain under warranty.
How Routine Roof Inspections Can Prevent Leaks
How Routine Roof Inspections Can Prevent Leaks
A roof typically lasts 20 to 25 years, but regular inspections can help extend its lifespan and prevent small issues from turning into major problems. Much like you schedule annual checkups for your health, a yearly roof inspection can save you from costly repairs down the road.
A thorough inspection should cover the following:
- Missing or damaged shingles
- Granule loss from shingles
- Issues with caulking or sealants
- Deteriorated flashing
- Pipes missing rubber boots or with rotted ones
- Sagging areas or wood rot
- Damaged or unsecured gutters
Addressing minor issues early can help you avoid expensive repairs. While some basic maintenance tasks can be tackled by homeowners, a professional inspection ensures all potential concerns are safely and thoroughly addressed. Without routine checks, the cost of a roof replacement can range between $6,700 and $80,000, whereas minor repairs typically cost between $150 and $7,000, depending on the roof design and materials.
Prepare Your Roof for Storms
If you live in an area prone to storms, it’s crucial to inspect your roof before bad weather hits. Preparing your roof in advance can help prevent major damage caused by heavy rain, snow, or winds. Catching small issues like loose shingles or faulty flashing can save you from larger repairs later.
A well-maintained roof has a better chance of surviving a storm than one that’s been neglected. Schedule maintenance during dry weather when repairs are easier and typically cheaper.
Prevent Roof Deterioration with Proper Attic Ventilation
Good attic ventilation is key to maintaining the health of your roof. A well-ventilated attic helps prevent moisture buildup and reduces heat that can degrade roofing materials. If you notice:
- Excess heat in the attic during summer
- Signs of mold or mildew
- Peeling paint or wallpaper
You may need to improve attic ventilation. Consider installing:
- Powered or solar attic fans to expel hot air.
- Additional insulation to reduce heat transfer.
- Turbine vents for energy-efficient ventilation.
- Properly placed soffit, ridge, or gable vents.
Regularly check your attic’s ventilation system to ensure it’s working effectively. Preventing moisture buildup and maintaining airflow can help your roof last longer.
Conclusion
Repairing a leaky roof quickly is crucial to avoiding costly damage. Regular inspections and proactive maintenance can help you catch problems early, preventing expensive repairs and extending the life of your roof. Whether you’re fixing minor issues or tackling a more significant leak, following these steps will help keep your home safe and secure.
FAQs
Why is it important to fix a leaky roof immediately?
A leaky roof can lead to severe damage like mold, insulation problems, electrical hazards, and costly repairs. It’s crucial to address leaks as soon as they appear.
How do I find the source of a roof leak?
Check your attic for water stains, mold, or mildew, then trace the leak upward. Using a hose on the roof can help pinpoint the exact area of leakage.
Can I repair a leaky roof myself?
Minor repairs like replacing shingles or flashing can be done by homeowners, but for significant leaks or complex issues, it’s best to consult a roofing contractor.
How often should I get my roof inspected?
Routine roof inspections are recommended annually to catch small leaks early. This helps extend the life of your roof and prevent costly damage.
What can I do to prevent roof leaks during a storm?
Inspect your roof before seasonal storms to fix any loose shingles or flashing. Proper storm prep can reduce the risk of leaks and minimize repair costs.